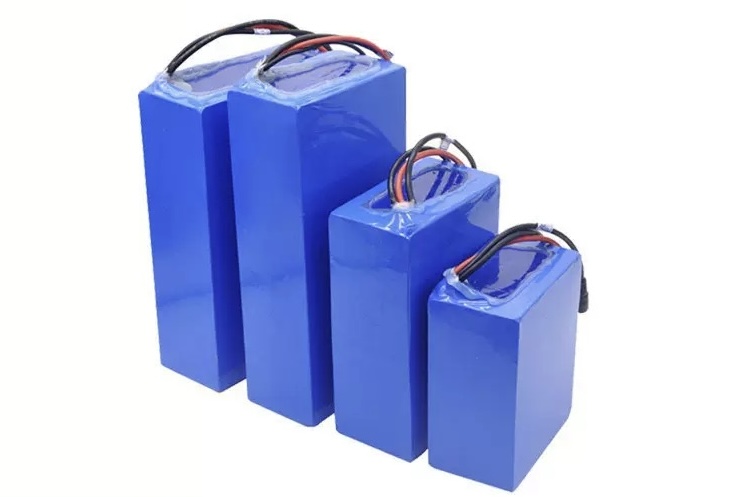
Connecting LiPo batteries1 in parallel seems simple but poses major risks if not done properly. Voltage mismatches or poor wiring can cause overheating2 or fire. Engineers and hobbyists alike often skip critical prep steps. Let’s break down exactly how to connect LiPos in parallel safely and effectively.
To connect LiPo batteries in parallel, first ensure all packs are at the same voltage (within 0.05V per cell). Then, connect all positive terminals together, and all negative terminals together. Use reliable connectors (like XT60/XT90) and heavy-gauge wires3 to handle current. Avoid connecting unmatched packs to prevent short circuits or degradation.
Safe parallel connection4 starts with a clear view of benefits and limits. The next sections explain what parallel LiPo setups can offer and how to control the main risks for reliable use in drones and other devices.
What Are the Benefits and Risks of Connecting LiPo Batteries in Parallel?
Parallel connection can boost capacity, but it also introduces new challenges. Unbalanced cells, faulty wiring, or mismatched internal resistances can degrade performance—or worse, cause thermal runaway5. Understanding both sides of the equation is key for advanced users and safety-critical applications.
The benefits of parallel LiPo connections include increased total capacity (Ah), longer runtime, and reduced load per cell. However, risks include potential for current surge6 if voltages mismatch, overheating, and imbalanced discharge. Safe implementation requires identical batteries7, precise voltage matching, and quality wiring to harness benefits without triggering failure.
Parallel connection changes how a system behaves under load, during charging, and in storage. A clear view of benefits helps with design decisions. A clear view of risks helps set safe rules for pack selection8, wiring, and daily use.
Main Benefits of Connecting LiPo Batteries in Parallel
Parallel connection keeps pack voltage the same as one battery but increases total charge capacity and current headroom. This change is important for systems that already match motor and controller to a fixed voltage. The user can improve endurance without changing power electronics9.
When cells or packs share current in parallel, each unit carries only part of the total load. This lower current per pack reduces stress, internal heat, and voltage sag. The effect can improve throttle response and keep voltage above cut-off for a longer time. Many drone and RC applications rely on this behavior when they push high power levels for short bursts and still need stable voltage.
Parallel packs can also support lower charge rates10 per pack during recharge. When a user charges a parallel group as one unit, the charge current spreads across all packs. Each pack sees a smaller effective rate, which can help reduce cell heating and slow down long-term aging, as long as the packs match well and stay balanced.
The following table gives a clear view of common benefits in parallel setups.
| Benefit | Description |
|---|---|
| Increased total capacity | Higher total milliamp-hours extend runtime without changing system voltage. |
| Higher current capability | More packs share load, so system can handle higher peak and continuous current. |
| Lower per-pack stress | Each pack carries less current, which reduces heating and voltage sag. |
| Better voltage stability | Combined capacity helps hold voltage under heavy load for longer. |
| Flexible pack combinations | Users can group smaller packs to meet different mission or job profiles. |
Parallel configurations also support modular logistics11. Users can bring several smaller packs instead of one large pack. After a mission or job, users can connect or disconnect packs based on charge level and need. This approach supports flexible inventory and easier transport, as regulations sometimes limit the size of single packs.
Key Risks and Failure Modes in Parallel LiPo Setups
Parallel LiPo connection also adds failure modes that do not appear in single-pack setups. The most serious risk is uncontrolled equalization current between packs. When packs in parallel sit at different voltages, the higher-voltage pack pushes current into the lower-voltage pack. This current can reach very high levels and can cause connector damage12, wire heating, internal cell stress, or fire.
Another risk is uneven current sharing under load. Packs with lower internal resistance tend to carry more current. Packs with higher resistance carry less current. Over time, the lower-resistance pack may heat more and age faster. This behavior can increase imbalance between packs and create a cycle of stress and degradation. If one pack weakens, the other packs take more load, which can push the whole group closer to failure.
A further risk comes from hidden cell damage or swelling in one pack. In a parallel group, a damaged pack does not always show its problem right away. The healthy packs can mask voltage sag during short tests. However, during long or heavy use, the weak pack can overheat, swell, or vent. Heat from that pack then raises the temperature of the whole group and can start a thermal event.
Parallel setups also have more connectors, more wires, and more joints. Each extra contact adds resistance and possible failure points. Loose connections can create local heating, intermittent power loss, or sparks. These problems grow in systems with high current, where any bad joint can cause rapid heating.
The table below lists common risks and their main impact.
| Risk Type | Impact on System |
|---|---|
| Voltage mismatch between packs | High cross-current, wire heating, connector damage, fire risk |
| Uneven current sharing | One pack carries more load, faster aging, increased failure chance |
| Hidden damaged or old pack | Sudden swelling, venting, or fire during charge or discharge |
| Extra connectors and wiring | More failure points, local heating, intermittent power issues |
| Complex fault detection | Harder to identify which pack fails inside a parallel group |
How Parallel Connection Affects Runtime and Performance
Parallel LiPo setups offer clear gains in runtime. When the total capacity of the group increases, the system can run for a longer time at the same average current. Users see this result as longer flight time in drones or longer operation in other devices. The same load, spread over more capacity, uses a smaller fraction of the available charge per pack.
Voltage behavior also changes. Since more capacity supports the same load, voltage drop under load tends to be smaller. The system can stay above the cut-off threshold for a longer part of the discharge curve13. This effect helps avoid early low-voltage cut-off events. It also stabilizes performance near the end of the discharge, where a single pack might show steeper voltage decline.
At the same time, total system current stays the same for a given power level. Each pack only carries part of that current. Lower per-pack current can keep cells cooler and may reduce internal chemical stress. Cooler cells often age slower, as long as other factors stay controlled, such as depth of discharge and high-voltage exposure during charge.
Parallel connection can also improve performance during short bursts. High-current pulses put heavy load on internal resistance. When more packs are in parallel, total effective resistance decreases. This change can support higher bursts without major voltage sag. Devices that need strong burst power can benefit from this behavior.
However, gains in performance can tempt users to push systems harder. Longer runtime and better voltage stability can lead to higher average power use. If the user increases weight or power draw because of the extra capacity, some benefits may fade. The system design should still respect limits of motors, controllers, wiring, and connectors.
Safety Practices for Parallel LiPo Use
Safe parallel operation starts with correct pack selection. Packs should match in cell count, nominal voltage, capacity class, C-rating, age, and general health. Packs should stay in a “set” and should always be used and charged together. This habit reduces divergence in aging and internal resistance. Packs that show swelling, damage, or unusual behavior must not join a parallel group.
Before connection, pack voltages should be checked and kept very close. Many users treat even small differences as a warning sign. Any visible gap means the packs did not track well in previous use, or one pack has different health. Good practice avoids parallel connection when voltages differ beyond the accepted small band.
Connectors and wires must match the total current of the group. All connectors in the path should support the highest expected load. Wiring should have proper gauge and strong solder joints. Parallel harnesses should have clear layout and strong strain relief so that no wire carries mechanical stress at the solder point.
Storage and charging procedures also need care. Parallel charge setups should only use packs that match well and that sit at similar voltage. Charging unattended parallel packs brings extra risk, because a problem in one pack can affect the others. Fire-safe charge areas, fireproof bags, and clear escape space around the packs are extremely important.
Parallel packs need regular inspection. Users should check for swelling, heat marks, unusual smell, or damaged insulation. Any pack that looks different from its partners should leave the set. Safe parallel practice accepts that some packs must retire earlier, because the cost of a fire or failure is much higher than the cost of a single battery.
When Parallel Connection Makes Sense
Parallel LiPo setups make sense when system voltage already matches the design of motors and controllers, but runtime is not enough. Parallel connection is also useful when the user has several smaller packs and wants to use them together instead of buying one large pack. In these cases, parallel wiring offers a practical path to more capacity and current headroom.
Parallel use still needs a strict approach to pack matching and inspection. Power system design must treat the parallel group as one larger energy source with higher failure impact. Good practices for wiring, fusing14, charge control15, and physical protection play a strong role in safe operation. When users follow these rules, parallel connections can bring large benefits with controlled risk.
Why Must All LiPo Batteries Be Exactly the Same Voltage Before Paralleling?
Even a small voltage difference between LiPo packs can cause dangerous current spikes when connected in parallel. Many overlook this crucial step. Ignoring it can result in rapid discharge from the higher-voltage pack into the lower one—risking fire and long-term damage.
LiPo batteries must be at nearly identical voltage (within ~0.05V per cell) before paralleling to prevent current surges. When voltages differ, the higher-charged pack tries to equalize the lower one rapidly, causing excessive heat and potential fire hazard. Always measure and match voltages before connection to maintain safety.

Parallel connection forces all packs to share one common voltage. This is a fixed rule of the circuit. When packs start at very similar voltages, the equalization step is small and safe. When packs start at different voltages, the equalization step is large and dangerous.
How Parallel Connection Forces Voltage Equality
Parallel connection links all positive terminals together and all negative terminals together. After the connection, there is only one positive node and one negative node. Every pack in the group must sit at the same voltage between these two nodes. There is no way around this rule.
Before connection, each pack has its own voltage. This voltage reflects its state of charge, temperature, and internal resistance. One pack may be closer to full. One pack may be closer to storage level. Another pack may be partly discharged. When these different packs connect in parallel, charge must move until all packs reach one common voltage.
This process happens automatically. It starts at the moment the connectors touch. The higher-voltage pack has more electrical potential at its terminals. The lower-voltage pack has less. Once the circuit closes, charge flows from higher to lower. The flow continues until the difference shrinks and all pack terminals share one level.
The equalization current does not go through a charger. The current does not follow an ESC path. The current goes directly through the harness and the pack internals. No electronic system can limit it. Only the natural resistance of wires, connectors, and cells slows it down.
This is why exact voltage matching is so important. The goal is to make the equalization step so small that the resulting current is also small. When the starting voltages sit almost the same, the forced adjustment after connection stays minor. The packs settle quickly without stress.
Why Small Voltage Differences Still Create High Current
Many users look at a small voltage difference and think it is safe. The numbers may seem close on the display. This can lead to a false sense of security. The problem is that LiPo systems often use low-resistance wiring and connectors. In such systems, even a small voltage gap can cause a strong surge of current.
High-performance LiPo packs have low internal resistance. Harness wires also use low resistance to support high current during normal operation. This low resistance is good for motors and controllers because it reduces voltage drop. The same low resistance becomes a problem when two packs at different voltages connect.
When the voltage difference is small but the resistance is also very small, the resulting current can still be very high. The surge happens fast. It concentrates at the moment of connection. The user cannot see it directly, but it can create sparks at the connectors and instant heating at contact points.
The LiPo chemistry also works within a narrow safe voltage window. A small difference near the top of the range can represent a notable difference in state of charge. Cells near full already sit close to their safe limit. If they must dump charge quickly into a lower pack, they see extra stress in a sensitive region. Cells in the lower pack must accept charge with no control over the rate.
Repeated exposure to such surges can change internal structure inside the cells. It can increase internal resistance and reduce capacity. Damage may not show at once. The pack may still work for some time. Later, the user may see more heat, swelling, or faster voltage drop16 under load. The root cause can be many uncontrolled equalization events17 in the past.
So even a “small” difference on a meter reading is not always small for the cells. The combination of low resistance, sensitive chemistry, and repeated events turns these differences into a real risk. This is why strict rules usually call for very tight voltage limits before paralleling.
Effects on Connectors, Wiring, and Pack Health
Voltage mismatch affects much more than cell chemistry. It also stresses every physical part in the current path. The main impact shows at connectors and wires18. These parts often see the full surge of equalization current at the instant of connection.
When the user plugs packs into a harness, the metal surfaces inside the connector touch and separate for a short time while the plug slides into place. During this sliding, there may be brief micro-gaps19. With a voltage difference present, these micro-gaps can support small arcs. The arcs can burn contact surfaces and leave pits and dark marks.
Damaged contact surfaces have higher resistance. Higher resistance creates more heating in later use, even at normal current. Over time, the connector may start to run hot. The plastic shell can soften or deform. The solder joints20 behind the contacts can weaken. These changes increase the chance of a later failure in flight or under load.
Wires also see stress during equalization. The surge current runs through the branch wires and the main leads. If the wire gauge is not generous, this current can heat the copper and the insulation quickly. Local hot spots can form where the wire bends or where strands are nicked or compressed. Insulation may age faster or crack.
Pack leads are part of the loop as well. The short sections of wire attached to each pack’s connector must carry the full transfer of charge between packs. These leads are often thinner than the main harness wires. Surges can therefore stress them strongly. A weak joint at the pack case can fail and create a dangerous arc near the cells.
Pack health suffers at the same time. The higher pack loses charge quickly, which can push some cells through rapid shallow cycling. The lower pack receives charge at a rate that may not match safe charge patterns. Cell temperatures can rise unevenly. Internal balance may drift.
As these effects repeat, one pack in a parallel set can age faster than the others. Its internal resistance rises. Its voltage behavior changes under load. When the packs connect again, the mismatch grows. The cycle becomes worse with each session. At some point, one pack can swell, vent, or fail outright.
Exact voltage matching breaks this cycle at its source. When the difference is almost zero, connector arcing is reduced. Wire heating is reduced. Cell stress from uncontrolled exchange of charge is reduced. The harness and the packs age in a more controlled and predictable way.
Practical Voltage Matching Rules for Safe Paralleling
Safe operation needs clear and simple rules. The first rule is that packs must match in cell count and chemistry. No mix of pack types goes into the same parallel group. Every pack must be the same series configuration and the same LiPo class.
The second rule is strict voltage checking before every parallel connection. A reliable meter or a good charger display must read pack voltage at the main leads. Packs that will join must sit inside a narrow band. Packs that fall outside that band must not connect. They must go back to controlled charge or discharge.
The third rule is to let packs rest before measurement. After charge or discharge, packs may show a temporary surface effect on voltage. A short rest period allows the voltage to stabilize. Measurement after rest gives a clearer picture of true state of charge.
The fourth rule is to keep packs in matched sets. Packs that are often used and charged together stay in the same group. They share similar histories. Their voltages after rest tend to stay closer. Mixing packs from different sets without a fresh check increases the chance of mismatch.
The fifth rule is to remove any pack that behaves differently. If one pack often shows a different voltage than its partners after the same treatment, it may be aging faster21. That pack should leave the parallel group. It can move to less demanding use or retire. Safety must come before the desire to keep every pack in service.
These rules turn voltage matching into a fixed habit. The habit prevents uncontrolled equalization current. The habit protects connectors, wiring, and cells. Exact voltage match before paralleling is not a minor detail. It is a core protection step for every parallel LiPo setup.
Is this section ok, or should it be adjusted before moving to the next subheading?
How Do You Safely Pre-Charge or Discharge LiPos to Match Voltage for Parallel Use?
Matching voltages before connecting LiPo batteries is essential, but many don’t know how to do it safely. Improper charging or discharging can cause overcurrent or cell degradation. You need a precise method for alignment before proceeding with parallel connection.
To safely match LiPo battery voltages, use a smart charger22 with individual charge/discharge settings. If voltages are close, use a resistor (e.g., 10Ω) to slowly balance them. For larger gaps, charge the lower pack and discharge the higher one individually to 0.01–0.02V accuracy. Always monitor with a multimeter.
The process of matching voltage is a preparation step, not a shortcut. Clear rules for safe pre-charge and discharge create a simple checklist that users can repeat every time they build a parallel group.
Importance of Controlled Voltage Alignment
Controlled voltage alignment23 is the foundation of safe parallel use. Each pack in a future parallel group must reach a narrow voltage band before any direct connection. This band keeps equalization current small and short. Controlled alignment uses equipment that can limit current, monitor voltage, and stop at defined thresholds.
Uncontrolled alignment happens when a higher-voltage pack and a lower-voltage pack connect directly. Charge moves fast between them, and there is no way to set a maximum current. This state is the opposite of safe practice. The goal of pre-charge or pre-discharge is to remove most of this difference before the packs ever meet at the parallel harness.
Smart chargers help with this process because they measure pack voltage and apply current in a regulated way. They also stop when they reach the target level. A user can choose a mode, a current limit, and a final voltage. The charger then does the detailed control. Simple resistive loads24 or improvised methods lack this intelligence, so they must be used with much more care and only in limited ways.
The method must also respect the long-term health of the pack. Strong charge or discharge rates during alignment can heat cells and age them faster. Since voltage alignment often happens near the upper or lower parts of the pack range, the cells sit closer to their stress limits. A slow, gentle process is therefore much better for safety and for life span.
Safe Methods to Lower Pack Voltage
When one pack sits noticeably higher than the others, its voltage must be reduced in a controlled way. The safest path is through a smart charger that has discharge and storage modes. These modes use internal electronics or an attached load to remove energy while monitoring voltage.
Storage mode is often the best choice when packs are far above the desired common point. This mode brings packs down toward a mid-range voltage that suits long-term storage. When all packs reach this level, a later charge can bring them up together in a precise and synchronized way. This sequence reduces stress and simplifies alignment.
Discharge mode is useful when a pack sits only slightly high. The user can set a gentle current and a target voltage. The charger will lower the pack slowly and then stop. Low current reduces internal heating and keeps cell temperatures close to ambient. Continuous monitoring protects the pack from slipping below the intended target.
Some systems may use external resistive loads that connect through the main leads, such as dedicated discharge devices that include a voltage monitor and an automatic cut-off. These tools can be acceptable when they follow LiPo-safe limits and include clear status indicators. Simple home-built resistive loads without monitoring are much less safe, because they require manual timing and constant supervision.
The table below shows common methods to lower pack voltage and how they compare in safety and control.
| Method | Control Level | Safety Level | Typical Use Case |
|---|---|---|---|
| Smart charger discharge mode | High | High | Fine tuning from slightly high voltage |
| Smart charger storage mode | High | High | Bringing packs to a shared storage level |
| Dedicated LiPo discharger | Medium | Medium | Group management with built-in cut-off |
| Raw resistive load | Low | Low | Only for experts with constant monitoring |
The discharge process must never push packs below the intended common band. Over-discharge near the bottom of the safe voltage range can damage cells quickly. Once the pack voltage crosses the target line, the process must stop and the pack must rest. Later measurement confirms that the voltage is stable and ready for parallel matching.
Safe Methods to Raise Pack Voltage
Some packs may sit lower than the intended group voltage. These packs need a controlled charge step. The only safe tool here is a proper LiPo charger set to the correct cell count, chemistry, and current. The charger must have reliable voltage sensing and must support cell balancing.
The best practice treats each pack as a separate unit during this phase. Each pack connects to the charger with its main leads and its balance connector. The charger then raises voltage in a controlled manner. It also reduces current near the end of charge, which is important for safety near the upper voltage limit.
The current setting for pre-charge should stay moderate. The goal is not to fill the pack completely in minimum time. The goal is only to bring the pack into line with others. A lower rate reduces cell heating. It also increases the margin for safety if something in the pack behaves differently than expected.
In many cases, it is more efficient to lower high packs than to raise low packs toward a fully charged level. A group that sits near a mid-range or storage range can then move together toward the final operating voltage in one step. This shared final charge also helps balance cells inside each pack before the parallel connection.
Some advanced chargers support multi-pack management through separate channels. Each pack can sit on its own channel while the charger brings all of them toward similar voltage levels. This method keeps packs isolated electrically but allows parallel work in time. The user gains both safety and convenience.
The next table lists common methods to raise pack voltage and their recommended use.
| Method | Control Level | Safety Level | Typical Use Case |
|---|---|---|---|
| Smart charger balance charge mode | High | High | Precise alignment before parallel use |
| Smart charger normal charge mode | High | High | General charging when packs are already similar |
| Parallel charge before matching | Low | Low | Not recommended for initial voltage alignment |
Parallel charging is sometimes used after packs already match well and form a stable set. It is not suitable for initial pre-charge when packs sit at different levels. Initial pre-charge must always happen with packs isolated to avoid uncontrolled equalization.
Recommended Voltage Matching Workflow
A clear workflow for voltage matching reduces mistakes. The first step is measurement. Each pack that may join a parallel group must go on a meter or a charger display by itself. The measured voltage is written down or at least checked against a strict allowed range.
The second step is grouping. Packs that sit near each other in voltage can move forward to the next stage. Packs that sit far away must go back into discharge or charge modes until they come closer. Packs that do not respond in normal ways or that drift fast in open-circuit voltage should leave the candidate pool.
The third step is fine adjustment. Slightly high packs use discharge or storage mode. Slightly low packs use slow balance charge. All steps use low to moderate currents and stay under direct monitoring. Cells must stay cool to the touch. Any unusual smell, sound, or swelling stops the process at once and removes the pack from use.
The fourth step is confirmation. After adjustment, packs should rest without load for some time. Rest allows surface voltage effects to calm down. After rest, packs go back on the meter. If readings still fall inside the strict band, the packs qualify for parallel connection.
The final step is documentation and discipline. Packs that have passed this process can form a named set. The set stays together for future missions and charges. Mixing sets without repeating the full check introduces new mismatches. A strict habit here pays off in safety and predictable behavior.
When this workflow is in place, voltage matching becomes a routine part of preparation. The process uses smart tools, gentle currents, and clear thresholds. Safe pre-charge and discharge then become reliable steps rather than risky improvisation.
What Is the Correct Wiring Method and Connector Setup for a Parallel LiPo Harness?
Incorrect wiring is a top cause of LiPo pack failure during parallel connection. Using weak wires or wrong connectors can lead to excessive heat, power loss, or catastrophic failure. Precision wiring and quality connectors are non-negotiable for safe, scalable systems.
A proper parallel harness uses equal-length, heavy-gauge wires (e.g., 12–14 AWG) with low-resistance connectors like XT60, XT90, or EC5. Positive terminals are joined on one bus; negatives on another. Include inline fuses or current-limiting resistors if needed. Avoid mixing wire lengths or grades to prevent current imbalance.
The harness25 acts as the spine of a parallel system26. When the harness follows clear rules27, the packs can work together with less heat, less stress, and fewer hidden faults. A simple layout with clear polarity and strong materials is often the best way.
Core Principles of Parallel LiPo Wiring
Correct parallel wiring starts with a simple rule. All positive terminals meet at one common positive bus. All negative terminals meet at one common negative bus. There is no crossing of leads between these two groups. There is no extra series link inside the harness. Each pack sees the same common nodes.
Every branch from a pack to the bus must offer a low-resistance path28. This path includes the pack’s own connector, the branch wire, the joint at the bus, and the main output connector29. When resistance stays low and uniform, each pack can share current in a more even way. No single branch should act as a weak route or a “bottleneck”.
The harness must also support the total current of the parallel group. The main positive and negative leads must have enough cross-section to handle the full load that all packs can deliver together. This design also covers fault cases where one branch might carry more than its share. The harness should not be the first part to fail.
Every joint in the harness must be secure. Solder joints should be complete and shiny and must not show cracks or cold surfaces. Crimp joints should hold the wire firmly with no loose strands. The outer insulation should cover the conductor fully. Heat-shrink tubing or molded shells should shield bare metal.
The harness layout must always protect polarity. The positive side and the negative side need clear markers. Color codes on wires and shells help. Markings on the housing and on the harness body add extra clarity. The goal is to make wrong connections unlikely even in poor light or under time pressure.
Star vs Daisy-Chain Layout for Current Sharing
Parallel harnesses often use two main layout styles. One is star layout30. One is daisy-chain layout31. These styles shape how current flows and how each pack sees the total load.
In a star layout, each pack branch connects to a central hub for positive and a central hub for negative. The hubs can be solid copper bars, thick bus wires, or a cluster of well-made joints. Each branch runs directly from the pack connector to this hub. Wire length and gauge can be made similar for all branches.
A star layout helps with more even current sharing. Since every pack “sees” the same bus, the distance from each pack to the main output is similar. Voltage drop along each branch can stay close. When resistance is similar, each pack tends to share current more evenly. The user can also inspect the hub area and each branch more easily.
In a daisy-chain layout, one pack branches closer to the main output connector, and the others branch off in sequence along the path. The pack closest to the main output often has the lowest path resistance. Packs farther away may see more voltage drop along the shared wire. This can pull more current from the near pack and less from the far pack.
Daisy-chain layouts can work in lower current systems, but they are not ideal for high-current parallel groups. Uneven current distribution can stress the near pack and its connector. Heat can build up in the shared sections of wire. Fault detection also becomes harder, since each joint affects more than one pack path.
Many safe parallel harnesses use some form of star layout. The center point does not need to be a perfect geometric node. The key is that each branch has its own direct, low-resistance connection to the common bus. When branches stay separate until the bus, the system behaves in a more predictable way.
The main output connector typically sits near this bus area. The main leads from the bus to the output connector should be short and thick. This link handles the full group current. Good harness design keeps this section as simple and robust as possible, with minimal bends and strong strain relief.
Choosing Wire Gauge, Length, and Insulation
Wire gauge in a parallel harness must match the expected current. Each branch wire carries the share for one pack. The main wires carry the sum for all packs. Thicker wire can carry higher current with less heating and less voltage drop. Thinner wire heats more and drops more voltage for the same current.
In many designs, branch wires use a gauge that suits one pack’s maximum safe current. The main wires then use a thicker gauge to suit the total of all branch currents. This pattern gives clear scaling. It also keeps each branch robust enough if one pack briefly carries more load.
Wire length matters for balance. When branch wires vary in length, branch resistance also varies. Longer wires add more resistance. Shorter wires add less. Packs on shorter branches then tend to deliver more current. Good design keeps branch lengths as equal as possible so that no pack has a clear advantage or disadvantage.
Harness routing should avoid sharp bends and tight loops. Each bend increases stress on copper strands and on the insulation layer. Repeated flexing at sharp bend points can break strands over time. Gentle curves reduce this mechanical stress. Fixed harnesses in airframes can use guides or clips to hold wires in place.
Insulation must match voltage and environment. LiPo packs in RC and drone use often sit near carbon fiber, metal screws, and sharp edges. Harness wires must have tough insulation that does not cut easily. Extra outer sleeves, spiral wrap, or braided sleeves can add protection along key sections.
The harness also needs good strain relief at every pack connector. A connector without strain relief can pull on solder joints or crimps when the wire moves. Over time, this pull can loosen joints or break strands at the entry point. Heat-shrink tubing that extends over both the connector shell and the wire can spread this load. Clips, glue, or molded boots can add more support.
Wire insulation color should clearly separate positive and negative runs. Common practice uses one strong color for positive and a different strong color for negative. The harness should not use the same color for both sides. Confusing color schemes invite polarity mistakes, which can cause instant failure.
Connector Orientation, Polarity, and Strain Relief
Connectors are the user interface of a parallel harness. They must direct every pack connection in one correct way. Every pack lead must mate with the harness without force or confusion. The more packs in the group, the more important clear orientation becomes.
A good harness uses one connector type and one polarity scheme for all pack inputs. The body shape, keying, and color help the user align each connection. The harness should not include mixed connector types on pack branches, because this complicates packing, inspection, and field work.
The main output connector must be sized for the largest current that the system can see in normal use. The main connector should also handle brief fault currents without melting. A connector that runs hot at normal load is a sign of under-sizing or poor contact. The user should check for heat after heavy use and upgrade if needed.
Polarity markings on connectors should stand out. Simple marks like “+” and “-” near each side of the plug and socket help. Color bands or printed sleeves can add extra clarity. Markings should appear on both the harness side and the pack side so that any mismatch becomes obvious.
Strain relief at connector entry points is vital. The harness side of each connector should have a short, stiff section that resists bending right at the joint. This section can be thick heat-shrink tubing, a molded boot, or a clamp. The aim is to move the bending zone a short distance away from the solder or crimp area.
The harness body should also attach to a fixed part of the frame or case. This anchor point takes the load when packs move during handling or in flight. The anchor prevents heavy connectors from pulling directly on the wires. Velcro straps, cable ties, or clamps can play this role.
Connectors in a parallel harness must also stay clean and undamaged. Dust, moisture, or impact marks can increase contact resistance and raise heat. Regular inspection for bent pins, burnt spots, or loose shells helps catch issues early. Any connector that feels loose or shows discoloration should leave service.
When all these small details come together, the harness becomes a reliable part of the power system. Packs plug in cleanly. Current flows with low resistance. Contact points stay cool. The harness then supports safe parallel use instead of becoming a hidden failure point.
How Do Balance Leads Work When Multiple LiPo Batteries Are Connected in Parallel?
Many users connect main power leads in parallel but ignore balance leads—leading to imbalanced cells over time. Cell-level imbalance reduces cycle life and raises safety risks. Including balance connections is critical for professional-grade setups.
In parallel-connected LiPo batteries, balance leads from each battery must also be connected in parallel to maintain consistent cell voltages across the pack. This ensures the charger can monitor and balance individual cells accurately. Always connect balance leads pin-for-pin, and never mix different cell counts or types.
Balance leads act as the “eyes and fingers” of the charger. Main leads carry most of the power. Balance leads monitor and trim each cell group. In parallel setups, both parts must work together under strict rules.
Role of Balance Leads in a Single LiPo Pack
Each LiPo pack has two heavy main leads and a group of thin balance wires. The main leads connect to the total positive and negative ends of the series stack. The balance leads connect to each junction between cells inside the pack.
The charger uses the balance connector as a measurement bus. It measures the voltage between the pack negative and each tap point in the series stack. The difference between tap points tells the charger how much voltage each cell holds. The charger can then compare these values and decide if a cell sits higher or lower than the others.
When one cell sits higher, the charger can drain a small amount of energy from that cell through the balance lead. The process uses low current. The aim is not to discharge the pack. The aim is to pull strong cells down slightly so that weak cells can catch up during charge. The result is a group of cells that finish closer in voltage.
Balance leads must carry only small currents under normal conditions. Their wire gauge is thin. Their connectors are compact. These parts are not designed for large charge or discharge flows. The main leads always carry the high current. The balance harness only trims small differences.
Balance leads also help with safety. If a cell voltage climbs near unsafe levels, the charger can stop charge based on data from the balance taps. The charger does not need to rely only on total pack voltage. It can see each cell and protect the weakest one. This protection is very important in multi-cell packs.
The relationship between pack voltage and cell voltages can be shown in a simple way. The table below gives typical voltage ranges for a common multi-cell pack. Values are approximate and may vary with brand and settings.
| Pack State | Per-Cell Voltage (approx.) | 4-Cell Pack Total (approx.) |
|---|---|---|
| Full charge range | 4.15 to 4.20 | 16.6 to 16.8 |
| Nominal mid range | 3.70 to 3.85 | 14.8 to 15.4 |
| Storage level range | 3.75 to 3.85 | 15.0 to 15.4 |
| Recommended low limit | 3.30 to 3.50 | 13.2 to 14.0 |
The balance connector therefore gives the charger detailed insight into where the pack sits inside these ranges at the cell level. This insight becomes even more important when multiple packs work together.
What Changes When Packs Are in Parallel Through Main Leads
When multiple packs connect in parallel through their main leads, they share the same total positive and total negative nodes. Their overall pack voltages align very closely because the main leads form a common bus. The combined system behaves like one larger pack from the viewpoint of the load.
However, inside each pack, the internal series stack still operates as a separate chain of cells. If only the main leads are in parallel and the balance leads stay isolated, the charger cannot directly compare cells from pack to pack. It can only monitor the cells inside each pack while the pack sits alone on a charger channel.
In many simple setups, packs are paralleled only during discharge. Each pack has its own balance connector and is balanced as a separate pack during charge on a separate channel. During use, the main leads share load, but balance leads do not connect to each other. This approach keeps the balancing job simple. The charger always sees only one pack at a time.
In more advanced systems, packs are paralleled during charge as well. In that case, both main leads and balance leads may connect in parallel through a dedicated parallel charge board or harness. The charger then sees each “cell group” across all packs as one larger cell. All cell ones work as a group. All cell twos work as a group, and so on.
This change has a strong impact on how balance leads behave. Each balance pin on the board becomes a shared node for that cell index. If one pack has a slightly higher cell at that position, and another pack has a slightly lower cell at that position, charge moves between them through both main and balance paths until they level.
This movement of charge is safe only when differences are small. The balance leads are thin and cannot carry large equalizing currents. Main leads can share the job, but if the mismatch is big, the first contact often goes through the balance pins. This can cause heat and damage at the board.
Parallel Balance Lead Connection Options
There are several ways to handle balance leads when multiple packs are part of a system. The choice depends on whether packs are paralleled only in use, also in charge, or built into a permanent assembly.
One common option is separate balancing32. Each pack charges alone on its own channel with its own balance plug. The packs join in parallel only at the main leads during discharge. In this layout, balance leads never connect between packs. Each pack maintains its own internal balance. The system relies on good pack matching and careful usage to keep packs similar.
Another option uses a parallel balance board33 during charge. The board has multiple identical balance sockets of the same cell count. All sockets feed a set of common rails inside the board, one rail for each balance pin position. The board feeds the charger through a single balance connector. The charger sees one “virtual pack” made from all packs in parallel.
In this layout, each cell group across all packs forms a larger group. The charger balances these groups. The charger does not know which pack contributes more or less. It only sees the combined group voltage. This setup can work well when all packs are very closely matched in age, internal condition, and starting voltage.
A third option appears in fixed multi-pack assemblies34. In these assemblies, packs may be wired in both series and parallel, and a custom balance harness reaches each combined cell node. The harness may join several cell junctions inside a shrink-wrapped pack block. From the outside, the user sees one balance plug that represents the whole assembly. Internal leads then connect cell groups in parallel at both main and tap levels.
The following table compares these approaches in simple terms.
| Balance Lead Strategy | Parallel Use Case | Charger View | Main Advantage |
|---|---|---|---|
| Separate balance, parallel use | Packs parallel only in discharge | Each pack separate | Clear cell data per pack |
| Parallel board, parallel charge | Packs parallel in charge and use | Combined cell groups | Faster group charge, simpler workflow |
| Integrated pack assembly | Packs built as one larger module | Single combined pack | Clean external wiring, fixed architecture |
Each approach has benefits and limits. The key factor is that balance leads must never hide large mismatches. Any method that combines balance lines from different packs demands very tight control of starting conditions.
Safety Rules for Balance Leads in Parallel Systems
Balance leads need special care in parallel systems because their wires are thin and their connectors are small. Safe use depends on strict voltage rules, correct pin mapping, and gentle handling during connection.
The first rule is that all packs must match in cell count. A balance board or harness is built for a specific pack type. A board made for a four-cell pack must not receive a three-cell or five-cell pack. Wrong cell count can shift each tap to the wrong pin. This can cause short circuits inside the board or at the charger.
The second rule is tight matching of total pack voltage before connecting either the main leads or the balance leads. Packs that differ too much must be adjusted first with controlled charge or discharge on separate channels. If a user plugs mismatched packs into a parallel board, equalizing currents can flow through the thin balance conductors as soon as the pins touch.
The third rule is to connect main leads first when using a parallel charge board that handles both main and balance connectors. Main leads can carry higher currents. They help bring pack voltages closer before balance pins engage deeply. After main leads settle, balance connectors can be inserted with lower stress. Many boards also rely on proper order to avoid arcing on the balance side.
The fourth rule is to keep all balance connections clean and undamaged. Bent pins, cracked plastic, or exposed solder can create high-resistance points or unintended shorts. Regular inspection and replacement of worn boards or pigtails reduce risk. Balance leads should also have strain relief so that motion of packs does not pull directly on tiny pins.
The fifth rule is to avoid using balance leads as general-purpose power paths. They are not designed to run fans, lights, or other loads. Any extra current that flows through balance wires adds to the stress that already comes from balancing action. In parallel systems, this extra demand can combine with equalization behavior and raise heat in the connector.
Balance-current limits matter as well. Chargers usually apply only small balancing currents. These currents are safe for the gauge of the wires. If a mismatch between cell groups pushes larger currents, the system leaves its design envelope. This state often appears when packs differ strongly. Good practice avoids that state entirely by keeping packs very similar before connection.
In many parallel systems, the most important protection is simple discipline. Users who always check voltage, always respect cell count, and always inspect balance connectors catch problems early. The balance harness can then do its job: monitor each cell group, correct small differences, and support safe charge of multiple packs without becoming a weak link.
Can You Charge Parallel-Connected LiPos with a Single Charger and Balance Port?
Charging parallel LiPos with a single charger saves time—but only if done correctly. Failure to match voltages or overloading the charger can damage cells or cause fire. Let’s clear up when and how it’s safe to do this.
Yes, you can charge multiple parallel-connected LiPo batteries with one charger—if all packs are identical in voltage, capacity, and cell count. Use a parallel charging board with integrated balance ports. Set the charger’s current limit to the total capacity (e.g., 3x2200mAh = 6.6A). Monitor cell temps and voltages.
Parallel charging can be efficient. It can also be unforgiving. A clear method, strict limits, and good hardware turn it from a risky shortcut into a controlled process.
Basic Idea of Parallel Charging With One Charger
Parallel charging uses one charger channel to handle several packs at the same time. The main leads of all packs connect to a common positive and a common negative bus. The balance leads also connect to shared rails through a parallel board. The charger then “sees” one large pack instead of many small ones.
In this setup, the total nominal voltage equals the voltage of a single pack. The total capacity equals the sum of all pack capacities. The charger setting for cell count stays the same as for one pack. The charge current setting changes, because the total capacity is higher.
When the charger runs, it sends current into the main bus. The current divides between packs according to their internal resistance and state of charge. The balance function supervises each cell group across all packs through the shared balance rails. The charger tries to keep each group within tight voltage limits until the charge finishes.
This idea works only when all packs are very similar. The charger cannot tell which pack holds which share of capacity. It cannot fix a single weak pack inside the group. It only manages combined values. Any large mismatch between packs falls outside its control range.
Conditions That Must Be Met Before Parallel Charging
Safe parallel charging requires several strict conditions. These conditions must be met every time. If any condition fails, packs should not connect in parallel for charge.
First, all packs must have the same cell count and the same chemistry. No pack may differ in series configuration. The parallel board must match that cell count. Wrong pack type or wrong board type can misalign the balance pins and create instant faults.
Second, pack voltages must be very close before connection. The difference must be small enough that equalizing currents remain low. Packs that sit higher or lower must be adjusted first by separate charge or discharge on individual channels. Parallel charging is not a way to correct large voltage gaps.
Third, packs must be in similar condition. Similar condition means close age, similar internal resistance, and no visible damage or swelling. A weak or old pack inside a parallel group can distort current sharing. The weak pack may heat fast and can pull down the group. Visual checks and past records help identify suspect packs.
Fourth, the total capacity must fit the charger’s current capability. The charger must support safe charge current for the sum of capacities. The user must select a reasonable current level and not push the charger or packs to extremes. A lower rate is safer in parallel setups because it reduces stress on every pack.
Fifth, the parallel board or harness must be of high quality. The board must have solid copper paths, strong connectors, and clear polarity marks. Poor boards with thin traces or loose sockets can overheat. They can fail before the packs do. This risk grows as more packs are added.
When all these conditions hold, parallel charging can proceed under supervision. When any condition does not hold, packs should be charged separately.
Charger Settings and Operating Practices
Correct charger settings are central to safe parallel charging. The cell count setting must match the series count of one pack. The chemistry setting must match LiPo requirements. Any mistake here can push the pack voltage outside safe limits. The charger must never be allowed to “auto-detect” wrong series counts based on a noisy reading.
Charge current must consider total capacity, hardware limits, and safety margins. Total capacity equals the sum of all packs. However, maximum current does not need to match the full theoretical limit of that sum. A moderate current gives better control and less heat. It also gives more time for the balancing stage to work with small differences.
Charge mode choice also matters. Balance charge mode is the safe standard for parallel packs. This mode uses data from the balance leads to keep each cell group within its target range. Fast charge or simple charge modes may not handle small differences as well. In parallel groups, small differences can grow into large ones if they are not corrected.
Operating practice during the session is important. The charge area should be clean, fire-resistant, and well ventilated. Packs and boards should sit on non-flammable surfaces. Users should keep some distance between groups to reduce heat transfer. No flammable items should sit close to the packs.
During the charge, temperature and smell are key indicators. Packs and connectors should stay only slightly warm at most. Any hot spots, swelling, noise, or odor must trigger an immediate stop. The power must disconnect, and the group must move to a safe area. Each pack must then be checked separately and handled as a possible failure.
At the end of charge, the charger usually enters a constant voltage stage and then stops. Users should not leave packs connected on a powered board longer than needed. Once charge finishes and cell voltages are confirmed, packs should be disconnected and stored or used according to plan.
Limits, Risks, and When Not to Parallel Charge
Parallel charging carries inherent limits and risks that do not appear when each pack has its own channel. Users must respect these limits. There are several cases where parallel charging should not be used.
Parallel charging should not be used for packs with unknown history. Packs from different owners, different storage conditions, or different usage patterns can differ internally. Without clear data, there is no way to know how they will share current. Separate charge on individual channels is safer for such packs.
Parallel charging should not handle packs that show swelling, damage, or past failure events. Any suspect pack must charge alone under extra supervision or must retire. Mixing suspect packs with healthy packs spreads risk across the entire group.
Parallel charging should not be used to “wake up” deeply discharged packs. A pack that dropped too low needs a controlled recovery attempt, if any. It should not join other packs until it shows normal behavior and stable voltage. Even then, caution is advised. Many users simply retire such packs.
Parallel charging should be limited to a reasonable number of packs per group. As more packs join, total current potential rises. Board loading increases. Fault detection becomes harder. Practical limits vary by hardware, but simple rules often keep the number of packs modest rather than large.
There is also a human factor. Parallel charging can create a sense of convenience. A user may become less careful with checks because the process seems routine. This is dangerous. Discipline must stay high. Each session needs the same voltage checks, visual inspections, and attention as the first session.
In many operations, a mix of methods works best. Critical packs or new packs may always charge alone. Sets that are well matched and well understood may use parallel charge to save time. The decision should come from a clear risk view, not from habit alone.
When Parallel Charging With a Single Port Makes Sense
Parallel charging with one charger and one balance port makes sense when the workflow is stable and disciplined. The packs should form fixed sets. Each set should always be used, stored, and charged together. The sets should be labeled and tracked over time.
In such conditions, packs age together and stay closer in performance. Voltage differences after use are smaller. Internal resistance values stay closer. The parallel board sees fewer surprises. The charger can manage the combined pack more easily.
Parallel charging also fits operations where many packs of the same type need regular cycling. A single well-sized charger and a high-quality board can handle a steady rhythm. The user saves time but does not ignore careful checks. The process becomes a clean, repeated routine.
However, parallel charging is never mandatory. It is a choice. The safer baseline is always separate charging with separate balance connections. Parallel charging trades some of that safety margin35 for convenience. Only strong procedures and strict limits can keep that trade reasonable.
When those conditions are met, parallel charging with a single charger and balance port can be both efficient and controlled. When they are not met, the risk rises sharply. The system then rests on luck, not on sound practice, and that is not acceptable for LiPo safety.
What Happens If One Battery in a Parallel Pack Has Higher Internal Resistance or Lower Capacity?
Not all batteries age the same. Using a degraded pack in a parallel setup may go unnoticed—until it overheats or collapses under load. Understanding internal resistance and capacity matching is key to building a reliable system.
If one battery in a parallel group has higher internal resistance or lower capacity, it will heat up more under load and may charge/discharge unevenly. This can shorten lifespan or trigger failure. Always match batteries by age, usage history, and IR values using a battery tester before combining.
Parallel packs behave like a team. The slow or weak member does not just underperform. The weak member forces the rest of the team to work harder. This effect grows as power demand increases.
How Higher Internal Resistance Changes Current Sharing
Internal resistance describes how much a pack resists current flow inside itself. Every LiPo has some internal resistance. Healthy packs of the same type and age often have similar values. When one pack in a parallel group has higher internal resistance, it does not behave like the others.
During discharge, voltage across each pack drops by an amount that depends on internal resistance and current. A pack with higher resistance drops more voltage for the same current. When packs are in parallel, they all sit at the same external voltage at the main leads. The system adjusts so that each pack finds a current that fits its internal resistance.
The low-resistance packs in the group can support more current without large voltage drop inside them. So these packs end up supplying a larger share of total current. The high-resistance pack supplies less current. This looks safe at first because the weak pack does not carry a heavy load. The problem is that the strong packs now carry more than their ideal share.
As demand rises, the strong packs heat more. The group may still keep voltage near the required level, so the user may not notice the imbalance. Under high load, the temperature of strong packs can rise to levels that shorten life and can reach unsafe points. The weak pack also heats because of its resistance, even if its current is smaller.
The table below shows a simple comparison between packs with different internal resistance inside one parallel group.
| Pack Type in Group | Effect on Current Share | Effect on Temperature and Stress |
|---|---|---|
| All packs similar IR | More even current share | Moderate and similar heating for all packs |
| One pack higher IR | Lower current share for that pack | Extra stress on low-IR packs, hidden heat |
| One pack much higher IR | Very low current share for that pack | Strong packs can overheat and age faster |
Because of this effect, internal resistance spread inside a parallel group must stay small. If one pack stands out as much higher, it is no longer a good member of the group. That pack should leave the set.
What Lower Capacity Does to Runtime and Voltage Sag
Capacity describes how much charge a pack can hold and deliver. In a parallel group, total capacity equals the sum of all pack capacities. When one pack has lower capacity than the rest, it does not fail at once. Instead, it reaches low state of charge earlier in the discharge.
As the group discharges, all packs start at a similar voltage. The lower-capacity pack empties faster in terms of stored charge. Its state of charge drops faster than the others. At some point, it reaches the low end of its safe range while the others still have margin.
The lower-capacity pack then shows deeper voltage drop under load. Its internal resistance may also increase as it nears empty. This change pulls its voltage lower than the others at any given current. In a parallel group, the external voltage of the node must be the same for all packs, so the system reshapes current flow.
The packs with more remaining charge and normal resistance now carry more of the load. The low-capacity pack carries less, but it is already near the bottom of its safe range. Under continued demand, its cells can cross into over-discharge. Over-discharge harms LiPo chemistry and can cause swelling, loss of capacity, or internal damage.
The whole parallel group may still present a decent total voltage, so the user might not notice that one pack is in trouble. The monitoring system36 often measures only total pack voltage at the main leads. It cannot see the condition of individual packs inside the parallel group.
This mismatch also affects runtime and performance. The group may show stronger voltage sag near the end of discharge because one pack is weak. The user may see less usable capacity than expected from the sum of nameplate values. The system may hit low-voltage warnings earlier than planned.
These issues grow in high-demand systems. High current draws amplify the effects of both internal resistance and low capacity. The weak pack becomes a limiting factor earlier in the mission or job. The system cannot use the full potential of the stronger packs without pushing the weak one into dangerous territory.
Combined Effect: One Pack Both Weaker and More Resistive
In many real cases, a pack with lower capacity also has higher internal resistance. Age, heat cycles, deep discharges, and past abuse can reduce capacity and increase resistance at the same time. When such a pack stays in a parallel group, it creates a complex set of problems.
At the start of discharge, the higher resistance pushes some current away from the weak pack. The group relies more on the stronger packs. The weak pack still participates but at a reduced rate. This can give the impression that the group is safe because the weakest pack is not heavily loaded.
As discharge continues, the weak pack’s state of charge drops faster because its effective usable range is smaller. Its voltage sag grows. Its internal resistance can rise even more as it goes deeper into discharge. The pack can reach an unstable zone where it heats more for the little current it still carries.
Meanwhile, the strong packs are carrying most of the load. They operate closer to their limits more often. Their temperature climbs and stays high for longer periods. They age faster than they would in a well-matched group. The whole set moves toward failure earlier than expected.
Signs of this combined mismatch can appear in several ways. The user may feel uneven heating among packs after a run. One pack may come down warmer or cooler than the others. The user may see swelling or soft spots in one pack but not in the rest. The measured voltage after rest may show one pack different from the group.
The table below summarizes typical symptoms when one pack has both higher internal resistance and lower capacity.
| Observation After Use | Likely Condition in Parallel Group |
|---|---|
| One pack warmer than others | Extra internal loss in that pack |
| One pack cooler yet swells | Low current but deep discharge and internal damage |
| One pack recovers to higher voltage | Reduced usable capacity and early voltage collapse |
| Group runtime lower than expected | One weak pack limiting performance and safety margin |
These signs show that the group is no longer balanced. Continued use in this state will likely lead to faster degradation and higher risk.
Impact on Safety, Monitoring, and Pack Management
The presence of a weak or high-resistance pack in a parallel group changes how safety systems work. Many ESCs and battery monitors rely on total voltage or overall current. They cannot see individual pack behavior inside a parallel pack cluster. A single weak pack can slip past these checks until a failure becomes obvious.
During charge, a weak pack can also behave differently. In parallel charging, the charger sees only combined cell-group voltages. The weak pack may accept more or less charge than the others, depending on its internal state. The charger may complete the cycle while one pack is still undercharged or overstressed. The imbalance then carries over into the next discharge.
Thermal behavior is a key safety signal. In a balanced group, pack temperatures track each other within a small range. If one pack runs much hotter or much cooler than the rest, the group may no longer be safe to keep as one set. Consistent temperature checks with the hand or with simple sensors can give useful feedback.
Pack management must respond to these signs. When one pack in a parallel set shows higher internal resistance, lower capacity, swelling, or odd temperature, it should leave the group. It may still serve in lower-stress roles alone, or it may retire. Keeping a clearly weak pack inside a high-current parallel group is not safe.
Record-keeping supports this process. Labeling packs and tracking age, cycle count in a rough way, and any incidents helps. Packs that have seen crashes, over-discharge, or high heat events deserve extra scrutiny. They may develop resistance and capacity issues faster than others.
Good practice also avoids mixing packs from different brands, capacities, or series in the same parallel group. Mixed groups are harder to manage and monitor. In a mixed group, it is harder to know what “normal” looks like. Uniform packs in a set make it easier to see when one pack starts to stray.
Parallel groups work best when every member behaves like the others. When one pack stands out in internal resistance or capacity, the group stability drops. The safe response is to treat that pack as separate, not as a full equal member of the parallel team. This approach protects both performance and safety.
How Do You Build or Buy a Safe, High-Current Parallel Adapter for LiPo Batteries?
Off-the-shelf adapters aren’t always built for high currents needed in drones, EVs, or industrial applications. Poorly constructed adapters can melt, arc, or catch fire. Here’s how to build or choose a safe, robust solution.
To build a safe high-current parallel adapter, use thick silicone-insulated wire37 (10–12 AWG), quality XT90 or EC5 connectors, and heat-shrink insulation. Ensure proper solder joints and spacing. For plug-and-play, buy from reputable brands rated for 50A+ continuous loads. Avoid generic brands with weak PCBs or untested designs.
A high-current adapter is part of the power system, not just an accessory. The quality of its design, materials, and workmanship decides whether the parallel setup runs cool and stable or becomes a point of failure that damages packs and equipment.
Key Design Requirements for High-Current Parallel Adapters
A safe parallel adapter must first meet clear electrical requirements. It must carry the maximum total current that the packs can deliver or draw in normal use. This current includes both continuous load and realistic bursts. The main bus conductors must have enough cross-section to stay cool and to keep voltage drop low along the harness or board.
Branch lines that feed each pack must match the pack’s own current capability. When one branch uses thinner wire than the others, that branch becomes a bottleneck. It heats more and drops more voltage. This change can distort current sharing and can raise local temperature to unsafe levels. Equal wire gauge and similar length across all branches help maintain similar resistance and more even sharing.
Connectors on both the pack side and the main output side must be rated for the highest current and voltage that the system will see. Ratings from connector makers usually assume good cooling and careful assembly. When connectors sit close together, as on many parallel boards, cooling can be worse. Realistic design treats the nominal rating as a limit, not as a target to exceed.
The number of pack inputs also affects safety. A larger number of parallel inputs creates more possible combinations and more current potential. If all packs can deliver high current, the adapter must be built as if that full current could flow. In high-power systems, it is often safer to limit the number of packs per adapter rather than fill a very dense board with many sockets.
The layout must ensure clear polarity and short, direct current paths. The positive bus and the negative bus should not cross or run too close without solid insulation. The layout should minimize loop area to reduce the effect of inductive spikes when loads change quickly. Straight, compact paths reduce both resistance and unwanted electrical noise.
Insulation strength and spacing are also design requirements. Even though LiPo systems often use moderate voltages, there can still be arcing if connectors are damaged or contaminated. The adapter must keep positive and negative elements separated by durable material and clear distance. Any exposed copper should be covered by solder mask, heat-shrink, or another protective layer.
Finally, the adapter must survive mechanical stress. Users plug and unplug packs many times. The design must include solid anchor points for connectors, strong support for copper traces or wires, and thick housings or covers that resist pulling, twisting, and vibration. Poor mechanical support can crack solder joints or copper paths and can lead to hot spots later.
Building a Parallel Harness: Layout, Soldering, and Strain Relief
When a user builds a harness from wire rather than using a board, the layout choices decide long-term reliability. A common safe pattern is a star layout. In a star layout, each pack branch runs directly to a central junction for positive and to a central junction for negative. These junctions can be formed by carefully joined wires or by thick copper bars. The distance from each pack connector to the center stays similar.
The star layout helps keep resistance similar for each branch. Each pack sees a similar path to the main output connector. This layout reduces the tendency for one path to be much shorter and lower in resistance than another. Current then divides in a more controlled way, which supports balanced operation and reduces stress on individual branches.
Soldering quality is very important in such a harness. Joints must be fully wetted, bright, and smooth. There should be no cold, dull, or cracked solder. Wires should be pre-tinned before joining in groups if needed, and the final joint should capture all strands. Any exposed conductor should be covered with heat-shrink tubing, and overlaps of insulation should ensure that there is no gap.
Multiple wires that meet at a central point should not simply be twisted together and left in the open. They should be formed into a compact bundle, soldered thoroughly, and then covered with a protective sleeve. Some builders also add an inner layer of insulation tape before heat-shrink to improve mechanical support at the junction.
Strain relief is a key part of safe harness design. Each branch should have a short section of stiffened wire near the connector, so bending does not focus directly at the solder joint. This can be done with thick heat-shrink that extends from the connector shell along the wire. The main bundle can be wrapped or sleeved to keep branch wires from moving independently and stressing their own joints.
The harness should also be anchored to a fixed point in the model or in the charge station. This anchor prevents the weight of packs from hanging on the main output connector or on a central junction. Cable ties, clamps, or straps can help secure the harness. A loose harness that swings or vibrates can break wires over time, even if the original soldering was good.
Routing of the harness must avoid sharp edges, moving parts, and heat sources. Wires should not rub against carbon fiber plates or metal frame parts without protection. Extra sleeves or grommets can protect wires where they pass through holes or near corners. Keeping enough slack in the right places also reduces tension when packs move slightly in their mounts.
Clear labeling finishes the build. Each branch can carry a small tag or color marking to show polarity and pack count. The main output connector should have prominent markings near the positive side. Labels help prevent mistakes during hectic field work and reduce the chance of reverse connections.
Safety Features and Protection Options
A high-current parallel adapter can include extra safety features beyond the basic wiring. One important option is branch-level protection. Protective parts can limit the impact of short circuits or connector faults and can reduce the scale of damage if one pack fails.
Some adapters use individual fuses or resettable protectors on each pack branch. These components sit between the branch connector and the main bus. If a branch draws more than a set current, the fuse opens or the protector increases its resistance. This action can isolate a failed pack or a dead short at one branch connector. The main group and the other packs then have a chance to survive.
Another safety feature is an anti-spark function38 at the main output. When high-capacity packs and large controllers connect, inrush currents can cause sparks at the connector. Anti-spark schemes use small resistive paths or special connectors that engage one contact slightly earlier than the main contacts. This gradual initial contact charges input capacitors more gently and reduces visible arcing.
Thermal management is also part of safety. A safe adapter layout allows air to flow around connectors and wires. Enclosures should not trap heat around joints that already operate warm. Some high-power users place temperature sensors on critical points to monitor heating during testing. Even without sensors, regular hand checks after heavy use can reveal hot spots.
Short-circuit protection must be considered during both normal operation and handling. Adapter designs that place exposed conductors close together increase the chance that a tool, wire, or piece of metal can bridge them. Safe designs recess contacts in plastic shells, cover solder joints, and avoid open screw terminals in high-current paths.
Visual inspection remains a core protection method. Any sign of discoloration, melting, cracking, or strange odor at the adapter should trigger closer examination. Shrink tubing that has pulled back, insulation that has turned brittle, or copper that shows dark spots may indicate overheating. Frequent parallel users should treat adapters as consumable parts that may need replacement after heavy service or after any suspected fault.
Finally, clear operating procedures protect both the adapter and the packs. Connectors should be mated slowly and firmly, not snapped in with force. Packs should be connected one at a time, with brief pauses to check for any unusual sound or spark. Disconnecting should follow a similar order, removing the main output from the rest of the system before working on individual branches when possible.
Choosing and Evaluating a Commercial Parallel Board or Harness
Many users prefer to buy a commercial parallel board or harness rather than build one. This choice can be safe if the product is evaluated with care. The external appearance alone is not enough. Several technical aspects deserve attention.
First, connector type and connector quality are critical. The board should use genuine or high-grade connectors that match the rest of the system. Loose-fit or soft metal contacts can heat and wear quickly. Sockets must hold plugs firmly without excessive force. Poor mating can lead to arcing, intermittent contact, and hot joints.
Second, the thickness and width of copper on the board must suit the current. Thick copper layers and wide tracks are needed in high-current areas. Thin tracks that snake between many pads are not ideal for large currents. Some boards include extra copper bars or heavy bus wires soldered on top of traces to increase capacity. Boards that do not show any reinforcement for high current may not be suitable.
Third, the density of inputs should match real needs. A board that accepts many packs in a small area can concentrate heat. If a user regularly connects many high-capacity packs at once, the board will face heavy thermal and electrical stress. A simpler board with fewer but more robust positions may be safer for that use case.
Fourth, the board should have clear documentation and specifications. Good makers provide maximum current ratings, recommended usage limits, and warnings. They also specify supported connector types and cell counts. Products that lack basic data or that make unrealistic claims about current capability are not reliable choices.
Fifth, mechanical support and protection matter. Solder joints that secure the bus bars and connectors should be visible and robust. The board may have mounting holes for fixing it in a safe location. Some boards come with protective covers that shield the copper and guide connectors. These features reduce accidental strain and shorting.
User feedback and long-term field reports can also help. Reviews from users who run similar current levels and pack sizes offer clues about real behavior. Reports of melted traces, burnt connectors, or cracked solder joints are clear warnings. Boards with consistent positive feedback under demanding use offer better confidence.
When a user evaluates or builds any parallel adapter for high-current LiPo use, the goal is always the same. The adapter must be stronger than the packs and loads that it connects. It must handle normal operation without heat and must react to faults in a predictable way. A safe adapter does not draw attention during use. It simply does its job quietly, while packs and systems deliver performance.
Conclusion
Parallel LiPo use offers clear benefits. Packs can deliver longer runtime, lower voltage sag, and higher current headroom at the same system voltage. However, these gains only appear when strict rules guide voltage matching, wiring, balance connections, and charging methods. Mismatched packs, weak harnesses, or poor boards can turn a simple setup into a major risk.
Safe practice treats every parallel group as one high-energy system. Packs must match in cell count, voltage, capacity range, and internal health. Harnesses and adapters must use strong connectors, proper wire gauge, and clear polarity. Charging must follow strict procedures and must use quality equipment. Regular inspection catches swelling, heat damage, or resistance changes before they become failures.
-
Understanding LiPo batteries is crucial for safe handling and effective use in various applications. ↩
-
Discover the causes of overheating to ensure safe operation and longevity of your batteries. ↩
-
Explore the importance of heavy-gauge wires for safe and efficient battery connections. ↩
-
Explore the mechanics of parallel connections to enhance your battery management skills. ↩
-
Learn about thermal runaway to recognize and mitigate this serious risk in battery use. ↩
-
Understanding current surges can help you design safer battery systems and avoid failures. ↩
-
Using identical batteries is key to safety and performance in parallel configurations. ↩
-
Proper pack selection is crucial for safety and performance; find out how to choose wisely. ↩
-
Understanding power electronics is vital for optimizing battery performance in devices. ↩
-
Understanding safe charge rates is essential for prolonging battery life and performance. ↩
-
Explore modular logistics to optimize your battery usage and transport. ↩
-
Learn about connector damage to prevent failures and ensure reliable battery connections. ↩
-
Understanding discharge curves helps in predicting battery performance and lifespan. ↩
-
Learn about fusing to protect your battery systems from overload and failure. ↩
-
Effective charge control is key to maintaining battery health; learn the best methods. ↩
-
Discover the factors leading to voltage drop and how to mitigate them. ↩
-
Explore the risks of uncontrolled equalization events and their effects on battery health. ↩
-
Learn about the importance of connectors and wires in ensuring safe battery operation. ↩
-
Explore how micro-gaps can lead to arcing and damage in electrical connections. ↩
-
Understanding solder joints can help in maintaining reliable electrical connections. ↩
-
Understand the factors that lead to faster aging of batteries for better management. ↩
-
Explore the essential features of smart chargers for optimal battery management. ↩
-
Learn why voltage alignment is crucial for safe and efficient battery use. ↩
-
Discover the role of resistive loads in safely managing battery voltages. ↩
-
Understanding parallel systems is crucial for optimizing performance and reliability in electrical setups. ↩
-
Discover the significance of following clear rules for effective and safe wiring practices. ↩
-
Learn about the importance of low-resistance paths for efficient current flow in electrical systems. ↩
-
Discover the importance of main output connectors for efficient power distribution. ↩
-
Learn about different insulation types to protect your wiring from environmental hazards. ↩
-
Understand the advantages of star layouts for even current distribution in electrical systems. ↩
-
Explore the daisy-chain layout and its implications for current distribution in wiring. ↩
-
Explore this resource to understand how separate balancing can enhance battery performance and safety. ↩
-
Learn about parallel balance boards and their advantages for efficient battery charging. ↩
-
Discover the benefits of fixed multi-pack assemblies for improved battery management. ↩
-
Understanding safety margins can help prevent battery failures and accidents. ↩
-
Monitoring systems are essential for tracking battery health and preventing failures. ↩
-
Silicone-insulated wire enhances safety and performance in high-current battery setups. ↩
-
An anti-spark function can prevent dangerous sparks; discover how it enhances safety during connections. ↩